STRENGTH BUILDING EXERCISES
PALMS DOWN
Overview
-
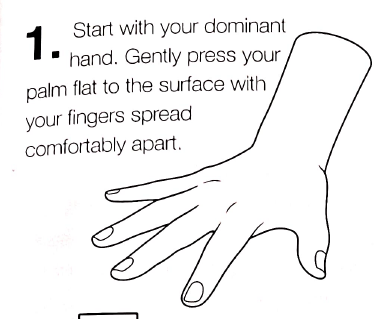
Begin by placing your dominant hand flat on a surface, ensuring that your fingers are spread comfortably apart. Press your palm gently against the surface to stabilize your hand.
-
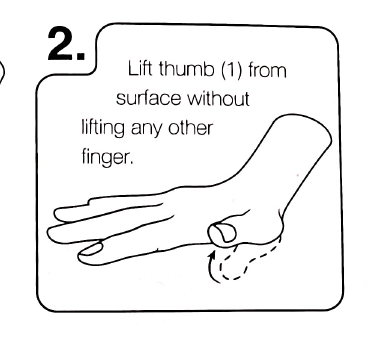
Start the exercise by lifting your thumb off the surface while keeping all other fingers pressed down. Ensure that only the thumb moves, and the rest of the fingers remain in contact with the surface.
-
Hold your thumb in the lifted position for a duration of 5 seconds. Focus on maintaining a steady hold without any shaking or other finger movements.
-
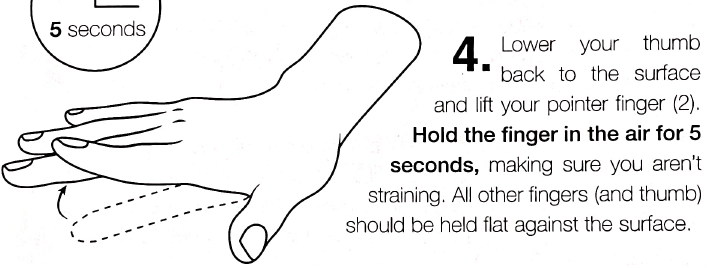
After the 5 seconds, lower your thumb back to the surface. Next, lift your pointer finger and hold it in the air for 5 seconds. Make sure that while you're lifting the pointer finger, your thumb and other fingers remain flat against the surface, ensuring you are not straining any part of your hand.
-
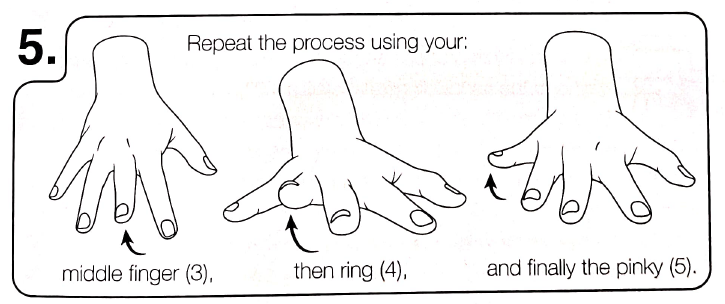
Continue this sequence with each finger on your hand: first the middle finger, then the ring finger, and finally the pinky, lifting each for 5 seconds.
After completing the sequence with all fingers, lift all five digits simultaneously for 5 seconds before returning them to the surface. Once completed, switch hands and repeat the entire sequence with your non-dominant hand to ensure balanced strength and dexterity in both hands.
It's important to perform the exercises gently and without straining to avoid injury. If you experience any pain or discomfort, stop the exercise and consult a healthcare professional if the pain continues.
Practice
- Start with your dominant hand. Gently press your palm flat to the surface with your fingers spread comfortably apart.
- Lift thumb (1) from surface without lifting any other finger.
-
Keep thumb (1) lifted for 5 seconds before returning it back to the surface.
-
Lower your thumb back to the surface and lift your pointer finger (2). Hold the finger in the air for 5 seconds, making sure you aren't straining. All other fingers (and thumb) should be held flat against the surface.
- Repeat the process using your: middle finger (3), then ring (4), and finally the pinky (5).
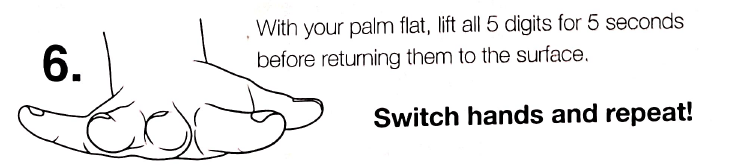
- With your palm flat, lift all 5 digits for 5 seconds before returning them to the surface.
Switch hands and repeat!
TIP TAPPING
Overview
-
Start by positioning your hand with the fingers curled slightly, placing only your thumb and finger tips firmly against a flat surface. Ensure that the palm of your hand does not touch the surface to maintain proper form throughout the exercise.
-
Begin with your thumb (labeled as '1' in the diagram). Firmly tap your thumb against the surface 10 to 15 times. Ensure that each tap is deliberate and lifts as high as is comfortable without causing strain. During this tapping, keep all other finger tips pressed against the surface to stabilize your hand.
-
Next, move on to your pointer finger (labeled as '2'). Tap this finger against the surface 10 to 15 times, similar to the thumb. Make sure to lift the finger as high as comfortable for each tap, while keeping all other fingers, including the thumb, in place against the surface.
-
Continue this process sequentially with the remaining fingers: start with the middle finger (labeled as '3'), then the ring finger (labeled as '4'), and finally the pinky (labeled as '5'). For each finger, repeat the tapping 10 to 15 times, ensuring each finger lifts independently while the others remain in contact with the surface.
-
After completing the taps with each finger on one hand, switch to the other hand and repeat the entire sequence. This exercise not only helps in building finger strength and dexterity but also ensures balanced development in both hands.
Practice
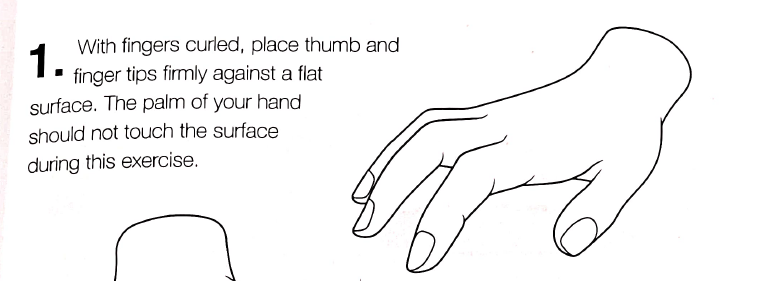
- With fingers curled, place thumb and finger tips firmly against a flat surface. The palm of your hand should not touch the surface during this exercise.
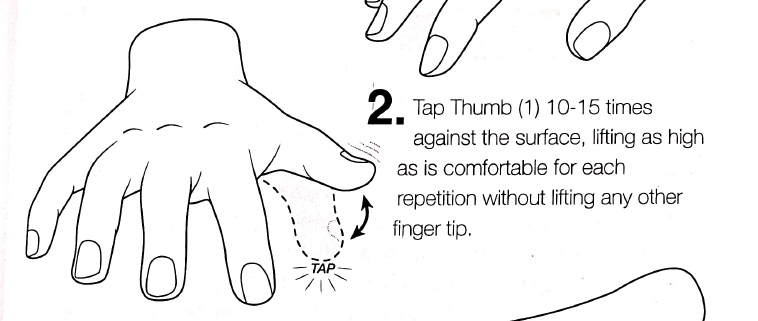
- Tap Thumb (1) 10-15 times against the surface, lifting as high as is comfortable for each repetition without lifting any other finger tip.
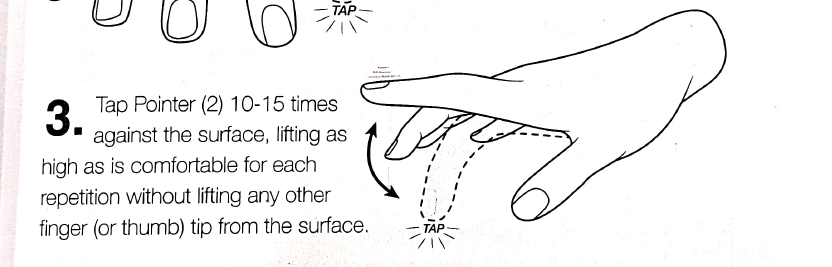
- Tap Pointer (2) 10-15 times against the surface, lifting as high as is comfortable for each repetition without lifting any other finger (or thumb) tip from the surface.
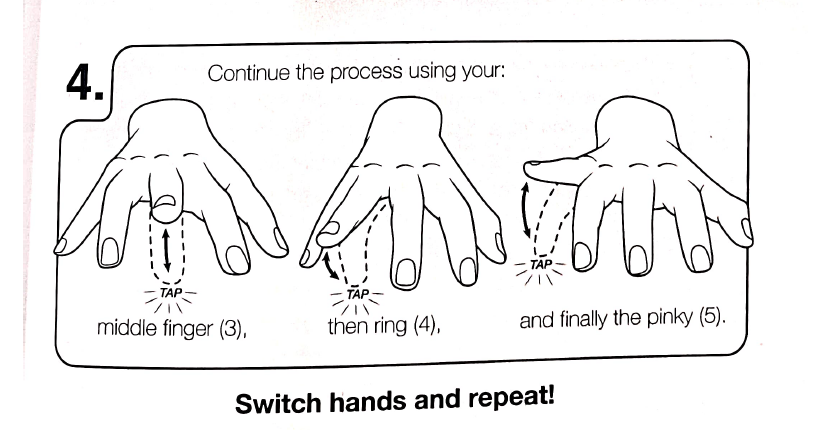
- Continue the process using your: middle finger (3), then ring (4), and finally the pinky (5).
Switch hands and repeat!
INVERTED TIP TAPPING
Overview
-
Begin the exercise by positioning your hand above a flat surface with your palm parallel to it, ensuring it does not touch the surface. This initial posture is critical for the exercise as it ensures your hand is prepared for the movement without any support from the surface.
-
Anchor your hand by placing only your thumb on the edge of the surface. Make sure your thumb's edge is comfortably pressed against the surface to stabilize your hand while the other fingers remain free to move.
-
Start the tapping sequence by using your fingertips only, beginning with the pointer finger (2), followed by the middle (3), ring (4), and pinky (5) fingers. Tap each finger against the surface one at a time in this order. Ensure that your thumb remains stationary and pressed against the surface throughout this sequence. Repeat this cycle 10 times before proceeding to the next step.
-
Change your anchor finger to the pointer finger (2). With the pointer finger now anchoring your hand, all other fingers except the pointer should be hovering above the surface. This change will test the dexterity and independence of your other fingers.
-
With the new anchoring setup, initiate the tapping sequence again, starting this time with the thumb (1), then moving to the middle (3), ring (4), and pinky (5) fingers. Tap each finger against the surface in this new order, ensuring that the anchor (pointer) finger remains stationary. Repeat this tapping sequence 10 times.
-
Continue this exercise by rotating the anchor finger through each finger on your hand. After completing the sequence with one anchor, switch to the next finger as the anchor and repeat the tapping cycle. Once every finger has been used as an anchor, switch hands and repeat the entire exercise with the other hand to ensure balanced training.
Practice
-
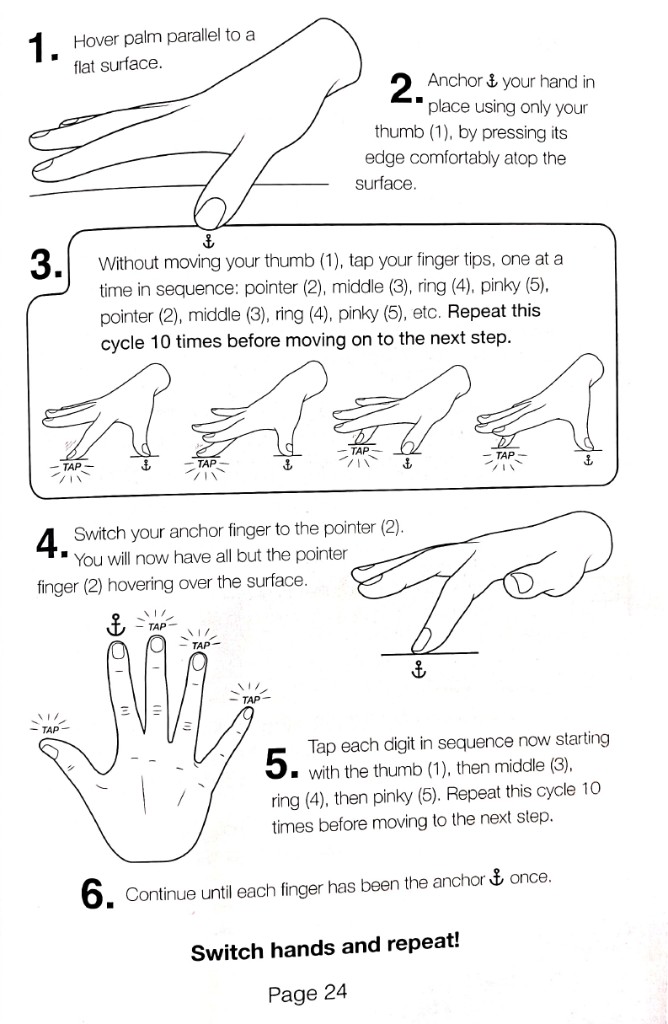
Hover palm parallel to a flat surface.
-
Anchor ⚓ your hand in place using only your thumb (1), by pressing its edge comfortably atop the surface.
-
Without moving your thumb (1), tap your finger tips, one at a time in sequence: pointer (2), middle (3), ring (4), pinky (5), pointer (2), middle (3), ring (4), pinky (5), etc. Repeat this cycle 10 times before moving on to the next step.
-
Switch your anchor finger to the pointer (2). You will now have all but the pointer finger (2) hovering over the surface.
-
Tap each digit in sequence now starting with the thumb (1), then middle (3), ring (4), then pinky (5). Repeat this cycle 10 times before moving to the next step.
-
Continue until each finger has been the anchor ⚓ once.
Switch hands and repeat!
PAIR LIFTS
Overview
-
Begin by positioning your hand with fingers curled, placing only the tips of your thumb and fingers firmly against a flat surface. Ensure that the palm of your hand does not touch but remains parallel to the surface. This starting position is crucial for effectively isolating finger movements during the exercise.
-
Start the exercise by lifting pairs of fingers off the surface in a specified sequence. First, lift the thumb and pointer finger together, ensuring they move simultaneously while keeping the rest of the fingers anchored to the surface. After completing the lift, return them to the starting position.
-
Continue the sequence by lifting the next pair: the pointer and middle fingers. Again, ensure these fingers lift together while the other fingers remain stationary. Return them to the surface after the lift.
-
Proceed with lifting the middle and ring fingers as a pair, followed by the ring finger and pinky. Each pair should be lifted cleanly off the surface while maintaining the anchor with the uninvolved fingers. This step requires careful control to prevent other fingers from moving.
-
After completing the lifts with all pairs, ensure that only the selected pairs are lifting from the surface at any given time; all other digits should remain firmly anchored. This isolation helps to strengthen individual finger coordination and dexterity.
-
Cycle through all the finger pairs repeatedly until you feel comfortable with their movement. Aim for smooth, controlled lifts, focusing on each hand separately before trying both simultaneously. Once you have mastered the sequence with one hand, switch to the other hand and repeat the entire exercise to ensure balanced strength and agility in both hands.
Practice
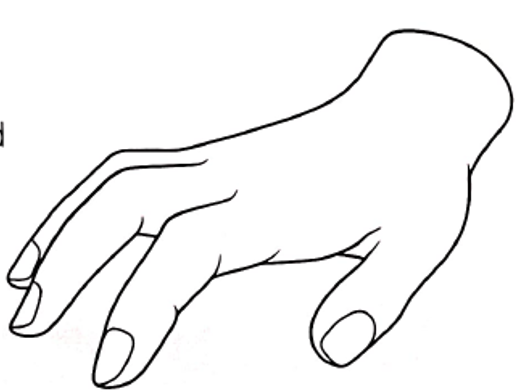
- With fingers curled, place thumb and finger tips firmly against a flat surface. The palm of your hand should not touch but should be parallel to the surface.
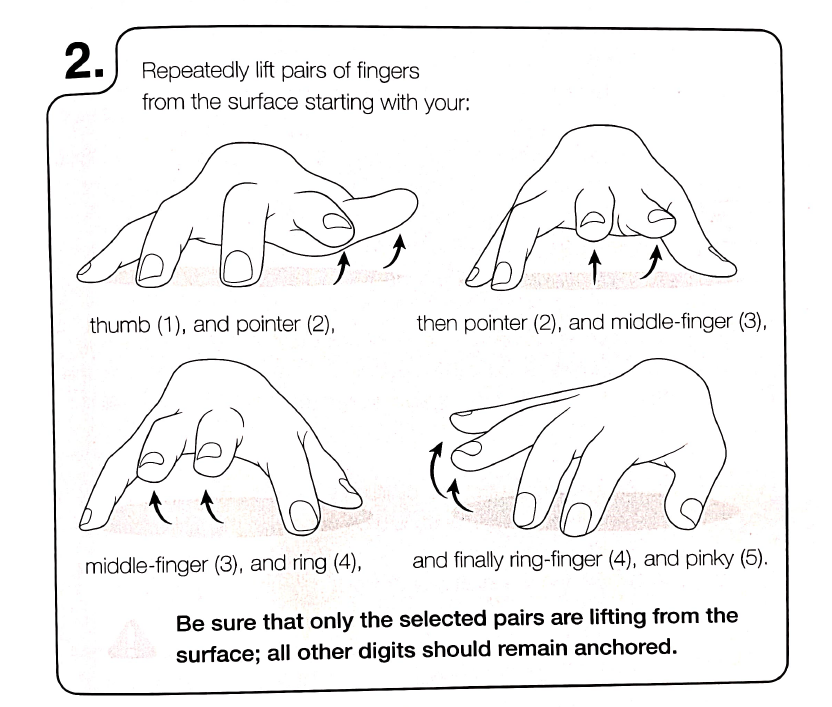
- Repeatedly lift pairs of fingers from the surface starting with your: thumb (1), and pointer (2), then pointer (2), and middle-finger (3), middle-finger (3), and ring (4), and finally ring-finger (4), and pinky (5).
Be sure that only the selected pairs are lifting from the surface; all other digits should remain anchored.
- Cycle through the finger pairs until you feel relatively comfortable controlling their movement using each hand separately, and simultaneously.
Switch hands and repeat!
NONADJACENT PAIR LIFTS
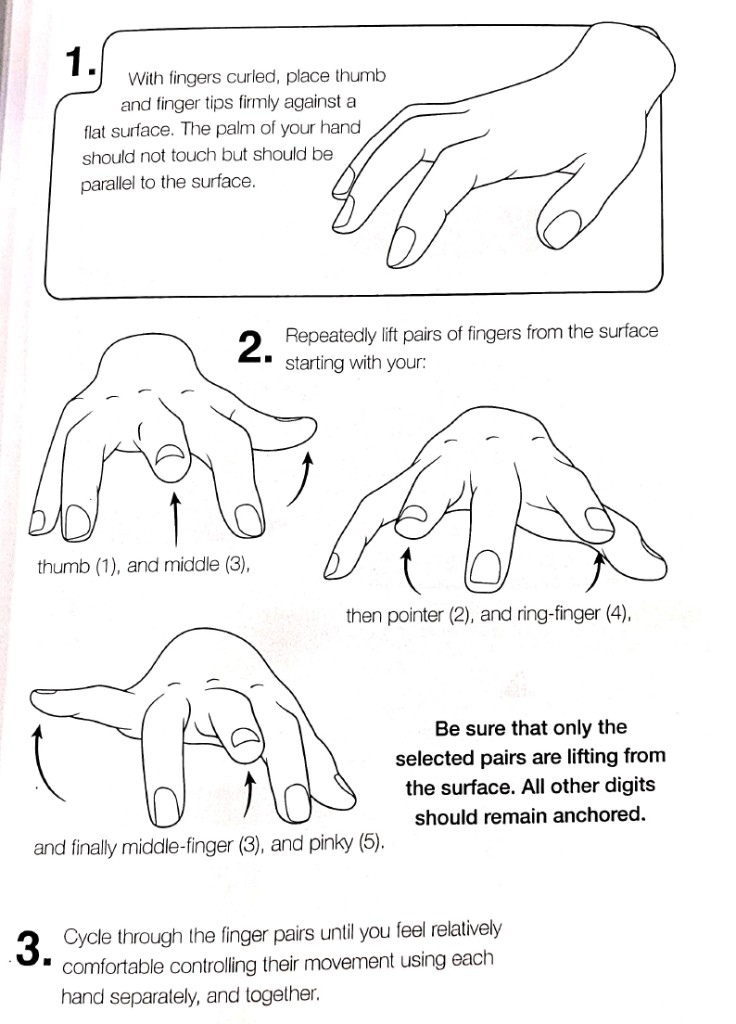
Overview
-
Begin by positioning your hand with your fingers slightly curled and the tips of your thumb and fingers pressing firmly against a flat surface. Ensure that the palm of your hand does not make contact with the surface, but remains parallel to it. This will help isolate the finger movements for the exercise.
-
Start the exercise by lifting specific pairs of fingers off the surface while keeping the other fingers anchored. Begin with your thumb and middle finger, lifting them simultaneously away from the surface. Ensure that during this movement, the rest of your fingers stay in place, touching the surface.
-
Proceed to the next pair by lifting the pointer finger and the ring finger together. As with the previous step, make sure to lift only the designated fingers while the others remain firmly pressed against the surface.
-
Continue with the last pair by lifting the middle finger and the pinky simultaneously. This should be done with the same care as the previous steps, ensuring that only the selected fingers are raised while the others stay anchored.
-
Repeat the sequence of lifting each pair of fingers multiple times. This cycle should be continued until you feel comfortable controlling their movements. It's important to practice using each hand separately and then together, to develop equal skill and strength in both hands.
Practice
-
With fingers curled, place thumb and finger tips firmly against a flat surface. The palm of your hand should not touch but should be parallel to the surface.
-
Repeatedly lift pairs of fingers from the surface starting with your: thumb (1), and middle (3), then pointer (2), and ring-finger (4), and finally middle-finger (3), and pinky (5).
Be sure that only the selected pairs are lifting from the surface. All other digits should remain anchored.
- Cycle through the finger pairs until you feel relatively comfortable controlling their movement using each hand separately, and together.
"The journey of a thousand miles begins with one step."
~ LAO TZU